Scissors-only flower tutorial

Paper Flower Cutting Design Step by Step

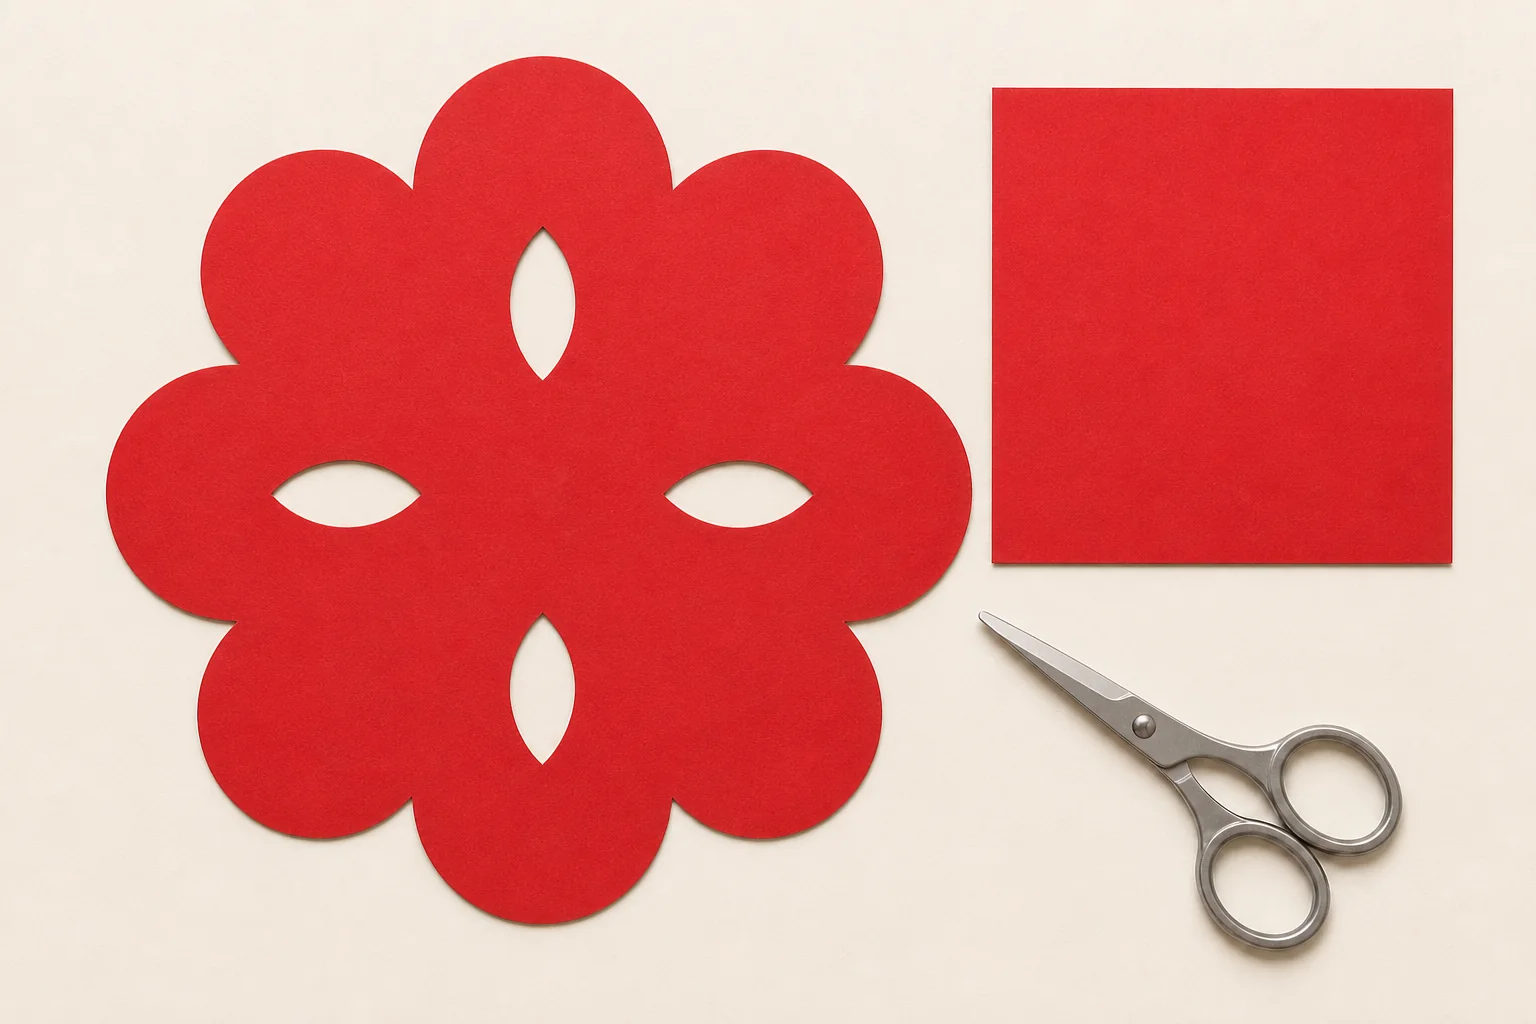
Make one flat, connected eight-petal flower from a single square of paper. Fold the sheet into eight layers, shape the open end, add one shallow V-shaped notch, and open it without cutting through the center connection.

Concept illustration of a connected red paper cutting with eight broad petals, four almond-shaped openings, and a solid center
AI-generated concept illustration. Follow the written sequence for the cutting geometry.

This tutorial makes one flat, eight-petal flower from a single square of paper. The single fold-edge notch opens into four almond-shaped spaces around the center.

It is a freehand exercise, not a downloadable template. The aim is to understand what each fold and cut will repeat before trying a more detailed flower pattern.

Know what should still be connected

The finished flower should remain one piece. Its eight broad petals meet at a solid center, and four almond-shaped openings stop well before that center.

Those uncut connections are often called bridges. A bridge does not have to be wide, but it must survive the pressure of cutting and unfolding. For this first flower, use broad petals and leave at least 15 mm of uncut paper around the pointed center of the folded packet. That measurement is a conservative guide for a 15 cm square, not a rule for every design.

If you cannot tell which point is the center after folding, stop before drawing. The center point has folded paper on both sides and no loose corner tips. The opposite end has stacked open edges.

Gather a small, scissors-only kit

You need one 15 cm square of smooth colored paper, a second square or offcut for a practice fold, a pencil with a light touch, small sharp scissors that can turn through a curve, and two clean sheets of plain paper with a light book for flattening.

Smooth paper around 70–100 gsm is a practical starting range for a folded beginner project. It is not a universal standard. GSM measures mass per unit area, but it cannot tell you by itself how stiff, dense, or slippery a sheet will feel. Utah Valley University Printing Services explains the measurement in its paper primer .

Fold a scrap into the same eight-layer packet and make one curved cut. If the layers slide, the fold cracks, or the scissors need force, change the paper before starting the flower. The site’s paper selection guide explains how weight, surface, and grain can change the result.

This project does not need a craft knife. Adults or teachers should choose scissors appropriate to the maker and supervise children throughout the activity. Keep fingers outside the blade path, and turn the paper rather than twisting the cutting hand. Broader tool choices belong in the paper-cutting tools guide.

Fold the square into one reliable packet

Make each crease sharp enough to hold the layers together, but do not rub so hard that the surface becomes polished or cracked.

  1. Fold the square in half. Place the square with the display side facing down. Bring the top edge to the bottom edge and align both corners before creasing. You should now have a rectangle.
  2. Fold the rectangle in half. Bring the left edge to the right edge. Align the open corners first, then press the fold. The packet is now a quarter-square with four layers.
  3. Make the diagonal fold. Find the corner where the two folded edges meet. Keep that corner fixed while bringing one side of the quarter-square onto the other to make a compact triangle.

The triangle now contains eight layers. The pointed closed tip represents the flower center. The wider end with loose stacked edges becomes the outer edge of the petals.
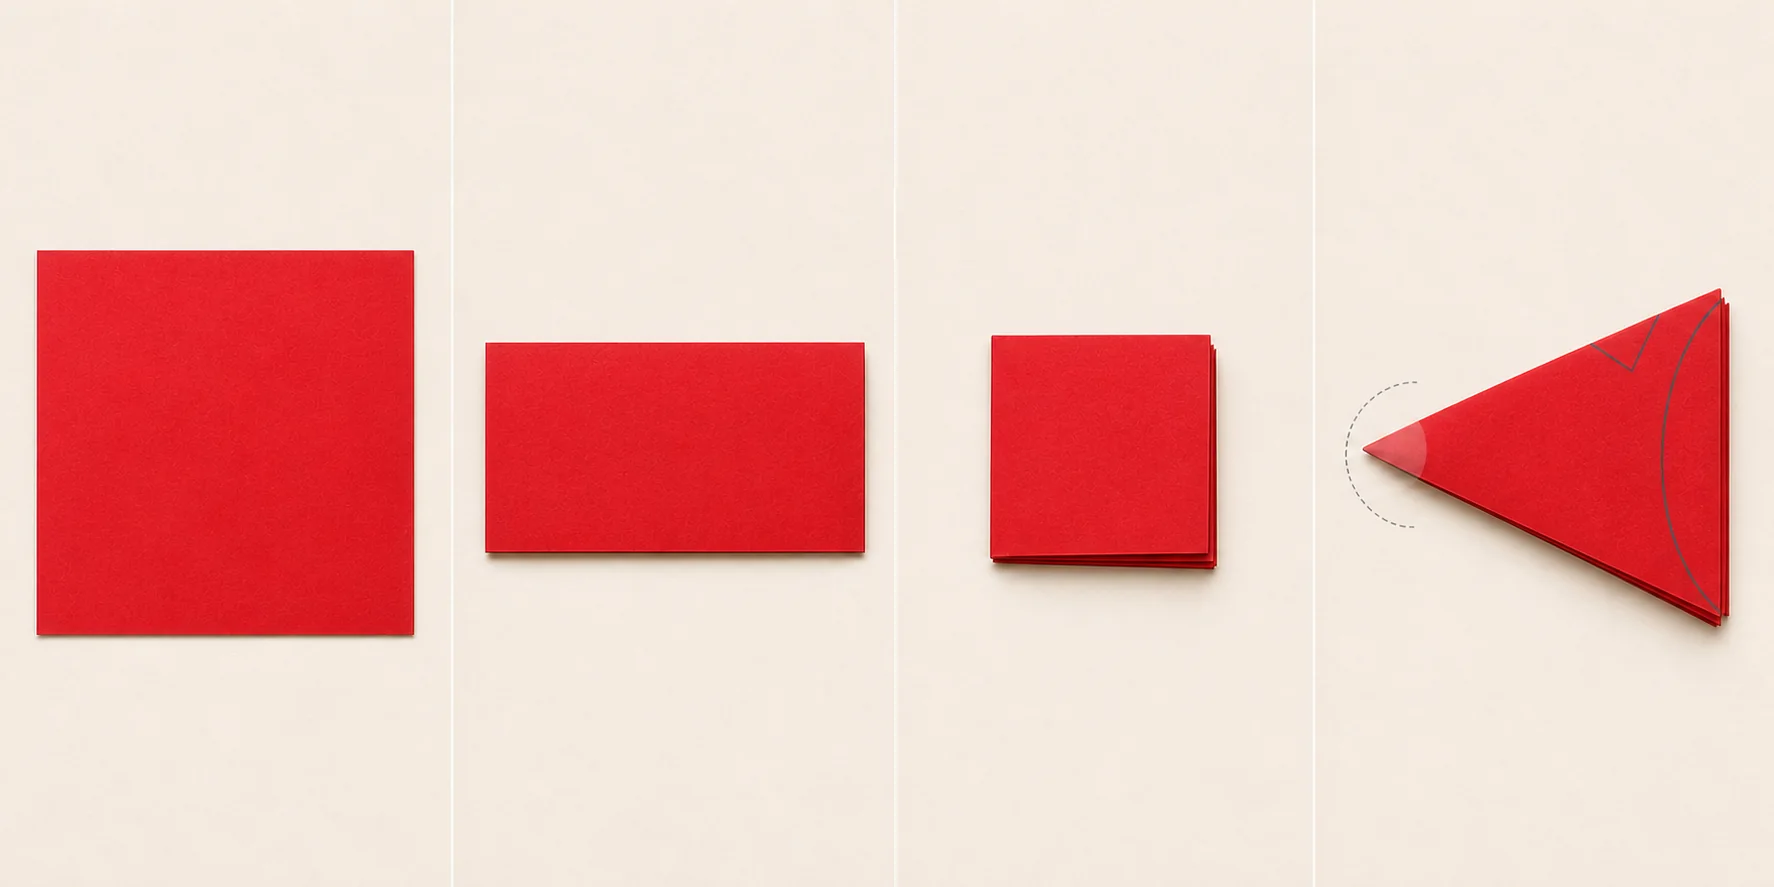
Four-panel concept illustration of a red square folded into a triangular packet and marked at the open edge
AI-generated fold concept. The dotted and pale area marks the center safety zone; use the written 15 mm check rather than treating this as a printable guide.

Mark cuts that ordinary scissors can reach

  1. Mark the no-cut zone. Measure about 15 mm back from the closed center tip and make a tiny pencil dot on each long side. Imagine a line joining the dots. No cut in this beginner design should cross that boundary.
  2. Draw the petal end. At the wide open end, draw one smooth rounded curve from one long edge to the other. Keep the curve broad. A tight point is harder to turn with scissors and more likely to shift the folded layers.
  3. Add one shallow V notch. On one long folded edge, draw one small V. It must begin at the paper edge, enter the packet, and return to the same edge. Stop well before the opposite edge and outside the no-cut zone.

Do not draw an enclosed hole. Ordinary scissors need an entry point from an edge. When the packet opens, the one fold-edge notch is mirrored across the square’s fold axes, forming four internal almond-shaped openings.

Cut the details without losing the center

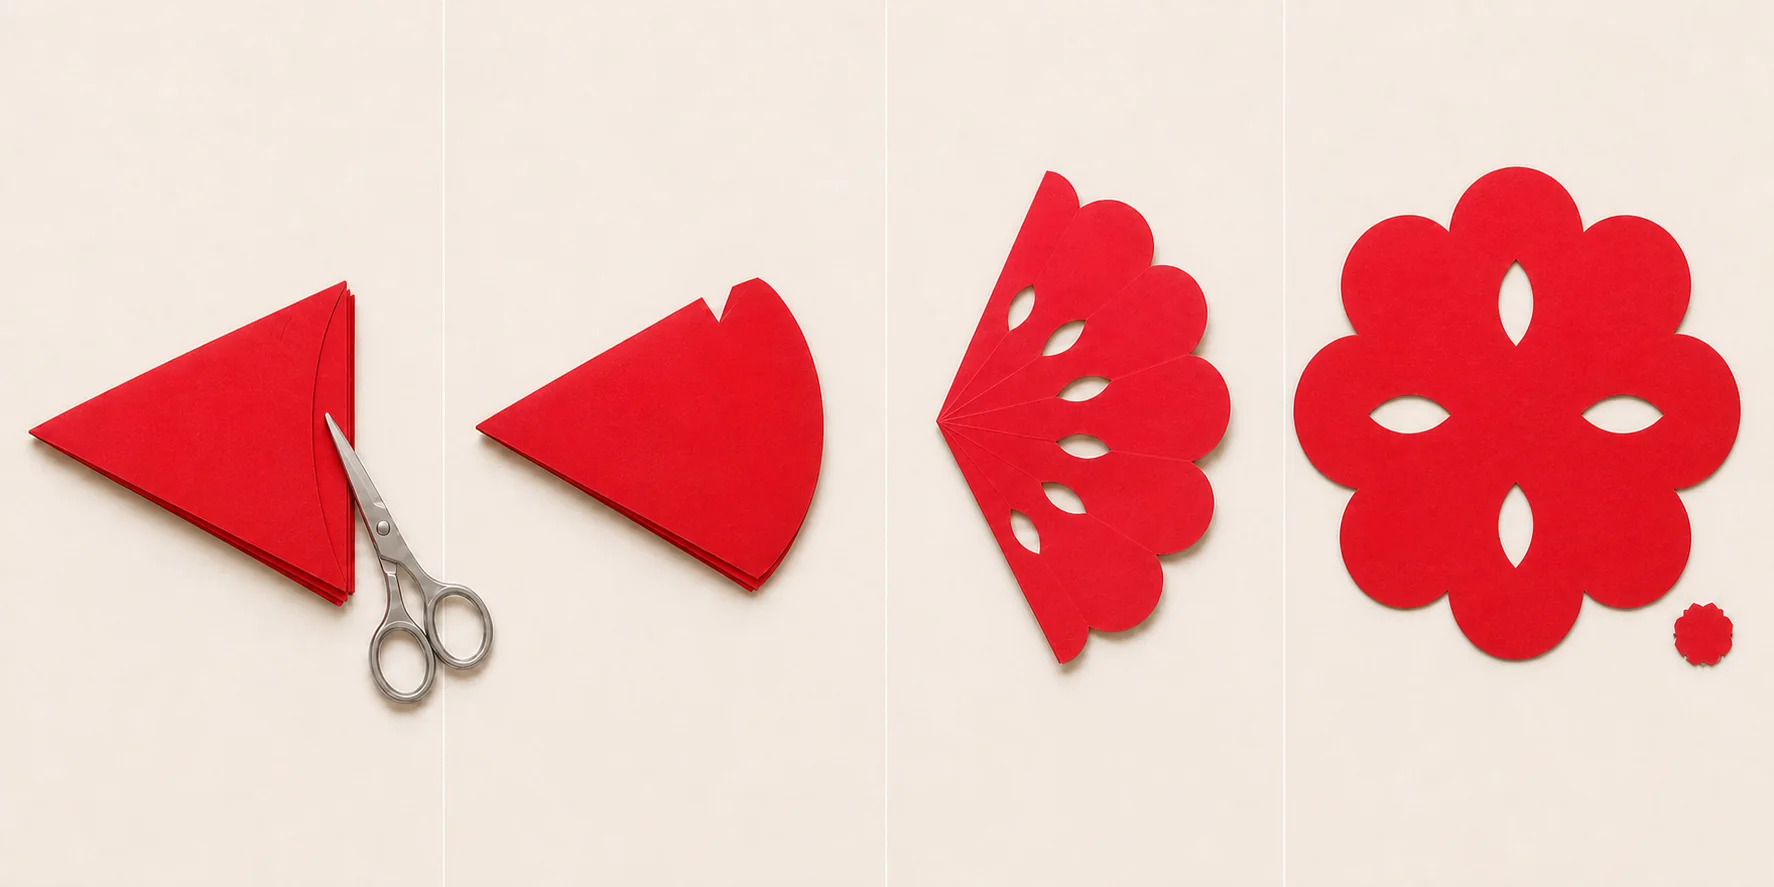
  1. Shape the outer petals first. Hold the packet behind the cutting line, with your fingers away from the blades. Begin at the open edge and follow the rounded curve in small, continuous cuts. Rotate the packet as the curve changes direction.
  2. Remove the shallow V notch. Cut into the V from the folded edge, turn at its point, and return to the same edge.

Before putting the scissors down, check that the pointed center tip is untouched, every notch returns to the edge where it began, and visible paper remains between each notch and the no-cut boundary. Do not add a last-minute cut simply because the folded packet looks plain.

Open one fold at a time

Lay the packet on the table and reverse only the last diagonal fold. If a cut catches, close the paper slightly and free that spot without pulling.

Open the quarter-square into a rectangle, then open the rectangle into the full sheet. Work from the center toward the petals. Tugging on an outer tip puts the most stress on the narrowest connections.

Place the flower between two clean sheets of plain paper. Rest a light book on top until the sharp creases relax. Do not iron the piece unless you know how that paper, coating, and color respond to heat.

Four-panel concept illustration of one rounded end cut, one folded-edge V notch, and an opened red flower with eight petals and four holes
AI-generated troubleshooting concept. The separate red center scrap represents the failure caused by cutting through the protected center.

Diagnose the cut before starting again

What you seeLikely causeChange on the next sheet
The flower separates into loose sectionsA cut crossed the center tip, entered the no-cut zone, or a second cut was added from the opposite sideEnlarge the untouched center, keep only one V, and make it shallower
Some petals are wider than othersThe corners were not aligned or the layers shifted during cuttingRefold the practice sheet and align open corners before creasing
Petal edges look chewed or fuzzyThe scissors were dull, the stack was too heavy, or too many tiny snips were usedTry a lighter sheet or sharper scissors and use longer controlled cuts
The fold cracksThe sheet is too stiff for eight layers or the surface coating does not tolerate the creaseTest a lighter, smoother paper
A narrow bridge tears while openingThe design was opened from an outer petal or the bridge was cut too thinOpen from the center, support each layer, and leave more paper around the next bridge
The flower will not lie flatThe creases still hold the folded shapePress it between clean sheets under light, even weight

Changing one variable at a time makes the problem easier to identify. If both the paper and the drawing change, you will not know which change fixed the cut.

Check the finished flower from the center outward

Set the open flower on a contrasting sheet and inspect it in this order: center, bridges, openings, petals, and back. The center should meet without a split; the narrow connections should stay intact; the repeated spaces should be clear rather than joined by paper fibers; the outer curves should be broad enough to hold their shape; and pencil lines should be faint or on the side you plan to hide.

Small differences between petals do not make the project unusable. This is a freehand cut. The useful question is whether the flower stays connected and whether the repeated spaces are readable.

For more on how folds, bridges, and negative space work together, continue with Paper Cutting Patterns & Symmetry.

Keep the cultural claim smaller than the craft

This beginner exercise uses red paper because the cut edges are easy to see and because red has an established place in Chinese paper cutting. The Smithsonian’s National Museum of Asian Art notes that red is associated with festivities and happiness, while other colors are also used. Its paper-cutting overview also identifies scissors and engraving knives as common tools.

The flower made here is a modern teaching exercise, not a reconstruction of a particular historical or regional design. Makers use many flower forms, and the meaning of a finished motif depends on its composition, occasion, region, and maker.

Craft table questions

Questions about paper flower cutting

How many petals will this folding sequence make?+

The outer curve makes eight repeated petal sections because it crosses all eight layers at the open end. The single V sits on one folded boundary; after the folds open, its paired edges form four internal openings on the square's symmetry axes. Misaligned folds can make some petals or openings narrower than others.

How do I find the center tip on the folded triangle?+

The center tip is the point formed by folded edges, with no loose paper corners. The opposite, wider end shows stacked open edges and becomes the outside of the petals.

Why did my paper flower fall apart when I opened it?+

A cut probably crossed the center tip, entered the no-cut zone, or was paired with another cut from the opposite folded edge. Leave a larger untouched center and make the single V notch shallower on the next sheet.

Can children follow this paper flower tutorial?+

Yes, with an adult or teacher choosing appropriate scissors and providing active supervision. Use broad cuts, omit the V notch when necessary, and do not substitute a craft knife.

Is there a printable flower template for this tutorial?+

No. This page teaches a freehand folding and cutting sequence. For a verified lotus SVG with its own printing instructions, use the separate paper-cutting flower template.

Next project

Try a verified lotus template after the freehand flower works.

Once the flower stays connected, the lotus template is a sensible next project because it adds nested petal openings without presenting a new download on this tutorial page.